Hi all,
This weeks challenge from Hels Sheridan was to create a piece including pink, not my natural 'go to' colour but I had a go.
I couldn't find a manilla tag so had to go with a kraft card one and the pale pinks seemed to disappear into the background, that is until I remembered that Picket Fence distress ink is opaque. I swiped the ink over the tag and dried it with a heat gun so I then had a patchy white surface to play on.
The background was done with victorian velvet, spun sugar and picked raspberries distress ink (is is just me but I always want to call it pickled raspberries for some reason!). I then stamped with picked raspberries using the small harlequin stamp from the Tim Holtz collection Mini Muse. The sentiment was from the Tim Holtz collection Mini Ornates and stamped in black archival ink.
I then used the Rivited Metal set texture fade to emboss a piece of the Tim Holtz idea-ology metal sheet which I cut along some of the embossed lines to give two small sections. To grunge up the metal I swiped it with black soot distress ink and dripped a little black alcohol ink to give a few spots, and then attached them to the tag. The flowers were from Hobbycraft but they were white so I decided to spray them with Apple Blossom Radiant Rain shimmering mist from Luminarte. This gave a lovely variegated colour to the flowers and also my hand!! (I think I missed the flowers)
I then cut some leaves using Sue Wilson's Faux Quilled Leaves die by Creative Expressions and separated them into small sprays. The flowers and leaves were then grouped over the metal to soften the edges. Loops of pink string were also added.
To finish the tag I dyed a piece of white seam binding with spun sugar distress ink and added this with some black seam binding and more pink string to the top of the tag.
Lyn
P.S. I am pleased to report that the ink finally came off my hand, it only lasted 5 days!
Wednesday, 14 May 2014
Saturday, 10 May 2014
12 Tags of 2014 - May
Hi all,
Another day, another challenge, this time Tim Holtz 12 Tags of 2014. This month the technique was a tiled tag and to incorporate some of the treasures we collect along the way. I'm sure these treasures are only for looking at not actually to USE!, but no! Tim wants us to use them and actually open the packets....oh the will power!
So, here we go....
The base tag was coloured using weathered wood, peacock feathers, and broken china distress stains using the wrinkle free technique. I then rubbed picket fence distress stain over the top to calm down the colours a bit, I also splatted the picket fence to give some nice white splats but then covered them up with the focal elements, oh well it did look good but ...
The various tiles were cut from one of the sheets in the French Industrial paper stash, these were distressed around the edges and inked with combinations of peacock feathers, spun sugar and a little walnut stain distress ink. The buttons, cotton reel, dress form, needle and pins were all cut using dies and variously inked, stamped and embossed as above.
The scissors were originally brass coloured but a bit too dark for the tag so a little silver pebeo gilding wax was added making them look suitably shabby. The thread was a freebie from some magazine and was green and white stripes, so out with the peacock feather distress ink and voila! green thread (also green fingers..no, nothing to do with the garden!). A little teal seam binding and more green thread finished off the tag and was held in place with a Tim Holtz wire pin, safety pin to us Brits.
All works of art need a title so a cute little "Tres Chic" stamp finished my tag.
Hope you like it.
Lyn
P.S. Yes I know I only used two embellishments from my stash, what can
I say "they are my precious-es"
Another day, another challenge, this time Tim Holtz 12 Tags of 2014. This month the technique was a tiled tag and to incorporate some of the treasures we collect along the way. I'm sure these treasures are only for looking at not actually to USE!, but no! Tim wants us to use them and actually open the packets....oh the will power!
So, here we go....
The base tag was coloured using weathered wood, peacock feathers, and broken china distress stains using the wrinkle free technique. I then rubbed picket fence distress stain over the top to calm down the colours a bit, I also splatted the picket fence to give some nice white splats but then covered them up with the focal elements, oh well it did look good but ...
The various tiles were cut from one of the sheets in the French Industrial paper stash, these were distressed around the edges and inked with combinations of peacock feathers, spun sugar and a little walnut stain distress ink. The buttons, cotton reel, dress form, needle and pins were all cut using dies and variously inked, stamped and embossed as above.
The scissors were originally brass coloured but a bit too dark for the tag so a little silver pebeo gilding wax was added making them look suitably shabby. The thread was a freebie from some magazine and was green and white stripes, so out with the peacock feather distress ink and voila! green thread (also green fingers..no, nothing to do with the garden!). A little teal seam binding and more green thread finished off the tag and was held in place with a Tim Holtz wire pin, safety pin to us Brits.
All works of art need a title so a cute little "Tres Chic" stamp finished my tag.
Hope you like it.
Lyn
P.S. Yes I know I only used two embellishments from my stash, what can
I say "they are my precious-es"
Tuesday, 6 May 2014
Sunday Stamper Week 306
Hi all,
Now that the Easter holidays, university finance applications, end of financial year, and a humungous pile of ironing are out of the way I can get down to some serious crafting. This is my latest effort for Hels Sheridans Sunday stamper challenge.
I have had this sentiment stamp for a while now and just love the things it says, the best one being 'drink wine' of course! It is from the IndigoBlu set called Enjoy life and here it is.
The background was done using the Tim Holtz marbled stains technique using faded jeans, broken china and peacock feathers distress stains. I love peacock feathers, my absolute fav colour in all things, in fact I find it difficult to not buy clothes if they are anything like this colour, at least most of my wardrobe matches! Peacock feather and chipped sapphire distress inks were used around the edges to frame the piece.
I then stamped a swirling musical stave from Joy crafts clear stamp set "Dance to the Music" in peacock feathers across the bottom of the card. The die cut stave is from Joy Crafts too although I had to chop a little off the length so my sentiment would fit down the side of the card.
Some fabric flowers that I have had kicking around the craft room for ages were layered up and attached with sparkly brads. Some skeleton leaves were cut from textured mirri card using the
Sue Wilson Faux Quilled Leaves dies from Creative Expressions and inserted among flowers.
I then matted the whole thing onto black card to give a nice border, I think I may use this as my Mothers Birthday card for the 31st of May. We are going to have a family gathering to celebrate, does anybody have any ear plugs?
Lyn
Now that the Easter holidays, university finance applications, end of financial year, and a humungous pile of ironing are out of the way I can get down to some serious crafting. This is my latest effort for Hels Sheridans Sunday stamper challenge.
I have had this sentiment stamp for a while now and just love the things it says, the best one being 'drink wine' of course! It is from the IndigoBlu set called Enjoy life and here it is.
The background was done using the Tim Holtz marbled stains technique using faded jeans, broken china and peacock feathers distress stains. I love peacock feathers, my absolute fav colour in all things, in fact I find it difficult to not buy clothes if they are anything like this colour, at least most of my wardrobe matches! Peacock feather and chipped sapphire distress inks were used around the edges to frame the piece.
I then stamped a swirling musical stave from Joy crafts clear stamp set "Dance to the Music" in peacock feathers across the bottom of the card. The die cut stave is from Joy Crafts too although I had to chop a little off the length so my sentiment would fit down the side of the card.
Some fabric flowers that I have had kicking around the craft room for ages were layered up and attached with sparkly brads. Some skeleton leaves were cut from textured mirri card using the
Sue Wilson Faux Quilled Leaves dies from Creative Expressions and inserted among flowers.
I then matted the whole thing onto black card to give a nice border, I think I may use this as my Mothers Birthday card for the 31st of May. We are going to have a family gathering to celebrate, does anybody have any ear plugs?
Lyn
Friday, 2 May 2014
Compendium of Curiosities III Challenge - challenge no.1
Having finished Creative Chemistry 102 I was at a loss for inspiration and along comes CC3C - so, here we go!
Here is my entry for challenge number one:
I started by making the background using the paint marbling technique and adding the clouds using the cloud mask from Clarity Stamp and chipped sapphire distress ink. The edges were stamped with the crackle stamp from the Sheena Douglass stamp set Ageing Beautifully and the chemical symbols stamp from IndigoBlus' Weird Science Series.
The balloon ship was stamped onto the background using ranger archival ink. A second image was stamped onto white card and coloured with pro markers and distressed with walnut stain distress ink. The stamp is from a Chocolate Baroque set called Steampunkery. This image was then decoupaged over the image on the background.
The strange and unusual plants are from the Chocolate Baroque set Punky Flowers, stamped and coloured as before and the light bulbs were triple embossed. These were then mounted on the background and two metal birds were added.
The sentiment, pointing hand and compass are from the Tim Holtz set called Warehouse District from Stampers Anonymous.
Thanks to Linda for starting this challenge series.and to Inspiration Emporium and The Funkie Junkie Boutique for sponsoring challenge number one.
Lyn Coogan
Saturday, 26 April 2014
Men are hard but teenage boys are impossible!
Hi all
I have a friend who has three teenage boys who I make the birthday cards for, this is a challenge! I know them but I don't know them, if you get my drift. Trying to keep up with their interests and likes and dislikes is a full time job, so... Its Josh's birthday so thats three cards, one from his parents, one from his brothers and one from us.
Don't get me wrong I love all of them and I enjoy making the cards for them but until inspiration strikes its a struggle. Today I had finished the card for his Mum and Dad and was considering the one from his brothers when I found a sheet of stamps I recently bought at Stamp Addicts in Bedfordshire and the little grey cells began to fire up.
This stamp sheet has a skull, top hats, moustaches and glasses all crying out to be decoupaged and glazed. The Hats have been triple embossed with embossing powder to give a nice shine. The glasses have also been embossed. The hats were stuck onto the skulls and then mounted onto some curled wire to give some movement.
The background was made using a Clarity Stamps stencil and mask and distress inks.
Hopefully this will make them laugh, it certainly made me smile.
Lyn
I have a friend who has three teenage boys who I make the birthday cards for, this is a challenge! I know them but I don't know them, if you get my drift. Trying to keep up with their interests and likes and dislikes is a full time job, so... Its Josh's birthday so thats three cards, one from his parents, one from his brothers and one from us.
Don't get me wrong I love all of them and I enjoy making the cards for them but until inspiration strikes its a struggle. Today I had finished the card for his Mum and Dad and was considering the one from his brothers when I found a sheet of stamps I recently bought at Stamp Addicts in Bedfordshire and the little grey cells began to fire up.
This stamp sheet has a skull, top hats, moustaches and glasses all crying out to be decoupaged and glazed. The Hats have been triple embossed with embossing powder to give a nice shine. The glasses have also been embossed. The hats were stuck onto the skulls and then mounted onto some curled wire to give some movement.
The background was made using a Clarity Stamps stencil and mask and distress inks.
Hopefully this will make them laugh, it certainly made me smile.
Lyn
Friday, 25 April 2014
Vintage 'Nature's Garden' panels Workshop
Hi all,
Yesterday I attended a workshop organised by Country View Crafts and run by Brenda Brown. We were using the new burlap panels from Tim Holts by Ranger. We had four of them to work on and Brenda had made some fab samples for us to base our efforts on.
The theme was nature so lots of foliage, birds and insects. Grunge paste was also on the menu, useful as I had just bought some and was in two minds what to do with it other than spread through a stencil.
Although we were following the instructions Brenda had printed out for us it was amazing how each persons efforts were totally different....fab. The workshop was from 10 till 4 and after a very enjoyable day full of inky fingers, lovely cake and gallons of tea we had produced our own works of art.
I'd just like to say thanks to Susan and Brenda for a fabulous day, looking forward to the next one ladies.
Lyn
P.S. Ive still got green fingers!
Yesterday I attended a workshop organised by Country View Crafts and run by Brenda Brown. We were using the new burlap panels from Tim Holts by Ranger. We had four of them to work on and Brenda had made some fab samples for us to base our efforts on.
The theme was nature so lots of foliage, birds and insects. Grunge paste was also on the menu, useful as I had just bought some and was in two minds what to do with it other than spread through a stencil.
Although we were following the instructions Brenda had printed out for us it was amazing how each persons efforts were totally different....fab. The workshop was from 10 till 4 and after a very enjoyable day full of inky fingers, lovely cake and gallons of tea we had produced our own works of art.
I'd just like to say thanks to Susan and Brenda for a fabulous day, looking forward to the next one ladies.
Lyn
P.S. Ive still got green fingers!
Wednesday, 16 April 2014
Wednesday Witterings
Today is Wednesday and the weather is still SUNNY. The wind however is still cold, so you cannot have everything. Still enjoying our break at Belton Woods Hotel. Had a little jaunt into Lincoln yesterday to see the swans...saw ONE! Caitlins friend is at Lincoln University and keeps saying how many swans there are, so do they take them in during the university vacations?
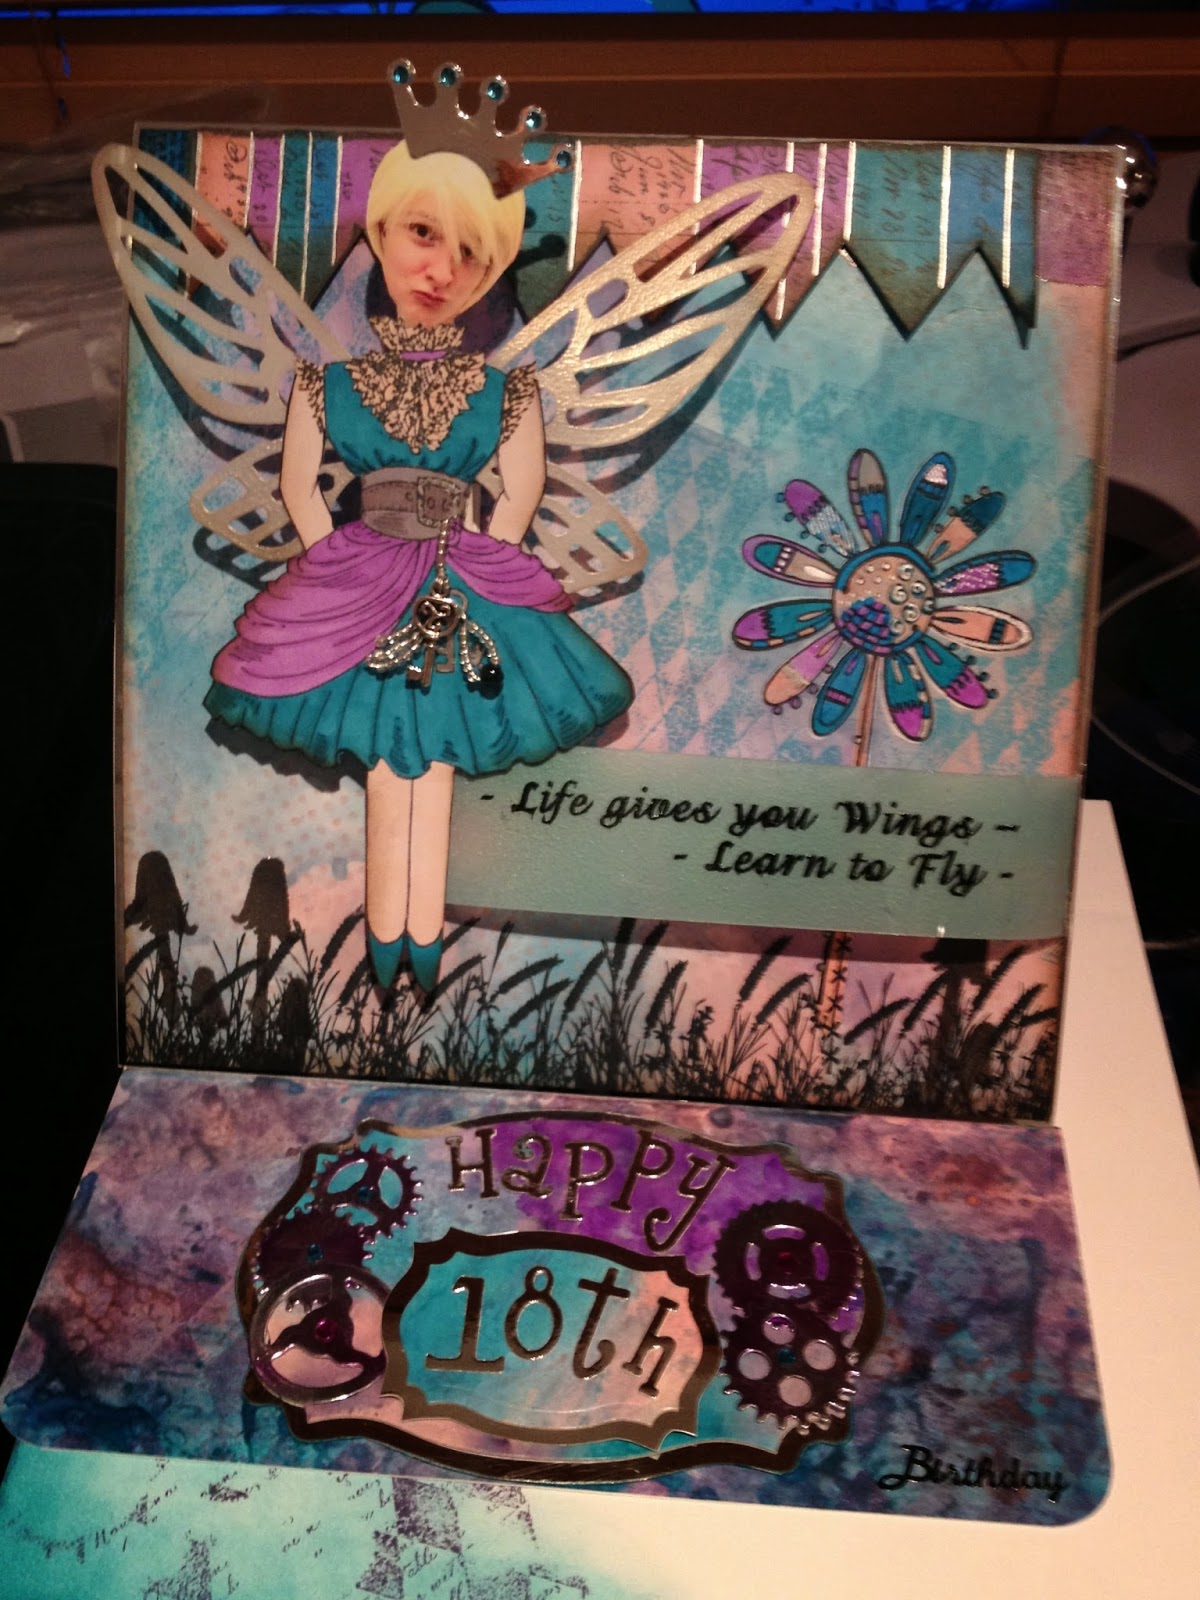
As I have mentioned Caitlin will be 18 this year (scary thought) and of course many of her friends will join her, although some of her Top Hat (weekend stage school) friends are already 18. Todays offering is the card I did for the friend at Lincoln University. Like most of Caitlins group she is a thespian and likes things a little over the top so...
I love the sentiment on this as at 18 it is very appropriate 'Life gives you wings, learn to fly'. the back ground is made with distress inks and overstamped with mushrooms and grasses from Indigo Blu. The head belongs to the birthday girl and was mounted on a small spring so she can nod to everyone. The wings and crown are from the Tim Holtz die fanciful flight - I think.
A bit of steampunk never goes amiss so the stop for the easel card is decorated with cogs and gears. The colour scheme is one of my favourites, I love pink and blue but not the pastel kind but strong vibrant colours like picked raspberry and peacock feathers.
Lyn
As I have mentioned Caitlin will be 18 this year (scary thought) and of course many of her friends will join her, although some of her Top Hat (weekend stage school) friends are already 18. Todays offering is the card I did for the friend at Lincoln University. Like most of Caitlins group she is a thespian and likes things a little over the top so...
I love the sentiment on this as at 18 it is very appropriate 'Life gives you wings, learn to fly'. the back ground is made with distress inks and overstamped with mushrooms and grasses from Indigo Blu. The head belongs to the birthday girl and was mounted on a small spring so she can nod to everyone. The wings and crown are from the Tim Holtz die fanciful flight - I think.
A bit of steampunk never goes amiss so the stop for the easel card is decorated with cogs and gears. The colour scheme is one of my favourites, I love pink and blue but not the pastel kind but strong vibrant colours like picked raspberry and peacock feathers.
Lyn
Subscribe to:
Posts (Atom)